|
|
||
|
online club magazine 1 - aug. 1988 - ƒ 3,95 |
||
|
P A R T S D O C U M E N T A T I O N |
||
| Parts
documentation Puch promotionteam rides through Holland An interview with... Photo contest This is also Puch -------------------------->>> |
|
A
word from the founder of the P.U.C.H. |
|
As of march 2001, we were made aware of copyright issues on certain
parts documentation. As a result, i had to cancel all official
copyrighted material. Therefor, i will put the do-it-yourself
maintenance tips here.
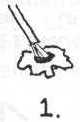
PART 1: SPOTS AND SCRATCHES. Material needed: 1. look for damaged or rust spots on the frame, mostly they are on the edges of the metal, like the rear fender. Also, you'll find 'warts' with the paint intact, but under the paint rust is building. Take the point of a flat screwdriver and put it downright (not under any angle) through the paint. Now you'll see the rust. Scratch the rust off and treat the spot with the sandpaper. Do this until the metal is clear, else the rust will start again in a couple of weeks. 2. Treat all spots this way, also make sure the spots you sanded are absolutely dirt and grease free! Rub the sanded surface with a clean cloth, you'll get the last loose material off like this. 3. If any paint damages or rust is beneath any transfer or sticker, it is wisely to remove the transfer or sticker completely and treat the surface. Later you can buy a new transfer set after you are finished. For a complete transferset you'll pay something like $5,00, so it's money well spend. 4. Sand at larger spots the surroundings with good paint slightly aswel, about 0,5 inch around the spot. You'll spraypaint this later to see no difference between the treated place and the paintwork that is still good. 5. Small places (0,1 inch) you can tip with a small paint brush. Tip
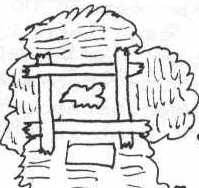
in the middle of the spot you want to treat. (figure #1). Not too much
paint on the brush and wait until the paint is dry (about 5-10 minutes)
before you treat the spot again with a second coating if neccessary.
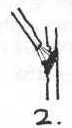
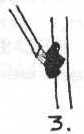
Figure #2 shows a sideview of a good treated spot, figure #3 is the
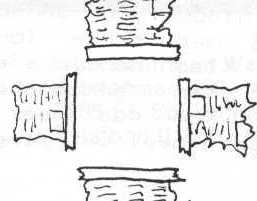
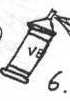
wrong way. 6. Larger spots (0,3 inches and larger) you'll have to tape off. Rip 4 pieces of newspaper and put the ducktape on the edges of each piece of paper (figure #4). Now put each piece around the spot you want to treat with a clearance of about 0,5 inch extra.(figure #5). 7. Start shaking the spraypaint for about 5 minutes. Remember: the longer you shake the paint in the can, the better it will hold and distribute itself on the spot. Take a piece of old newspaper and spray from a distance of about 0,7 feet to see how you have to hold the spraypaintcan. Hold the can slightly downwards when you spray (figure #6). Corners you'll spray on the corner and from top to bottom. Side and top surfaces you paint from front to back, because that is the way the Puch Maxi was painted in the factory too. 8. Repeat this 2 or 3 times, spray each time a little bit of paint, not too much all at once and let the paint dry for 10-15 minutes before you apply the next layer of paint. 9. Now let it all dry for at least an hour or 3 en remove carefully the newspaper. 10. Wait at least a day before you apply the new transfers if you had to remove these. This is to let the paint dry in; to let it harden. Good luck!! |
|
Sinds maart 2001, zijn wij erop gewezen dat er nog altijd copyright rust
op bepaalde documentatie. Dit betekent dat ik geen officieel materiaal
meer kan gebruiken. In plaats daarvan plaats ik hier de doe-het-zelf en
onderhouds tips.
DEEL 1: PLEKJES BIJWEKREN. Benodigheden: 1. Stel vast waar je kale of beschadigde plekjes of plekken ziet,
meestal zitten deze op de randen van het metaal, dus ook langs het
achterspatbord en zo. 2. Maak zo alle plekjes kaal en vetvrij. Het vetvrij maken doe je met een schone droge zachte doek. Ook veeg je zo nog eventuele losse schilfers weg. 3. Zitten er lakbeschadigingen geheel of gedeeltelijk bij of onder een transfer (=sticker), dan doe je er goed aan om deze te verwijderen en later opnieuw aan te schaffen. Voor een komplete transferset voor de hele brommer ben je meestal rond de 10 gulden kwijt, dus daar hoef je het ook niet voor te laten. 4. Schuur bij grote plekken ook de nog goede lak even licht, ongeveer 1 cm rondom de plek. Hier wordt straks de nieuwe lak ook op gespoten om geen overgangen tussen oude en nieuwe lak te zien. 5. Kleine plekjes (ca. 1 tot 4 mm) werk je bij met een lakstift. Tip in het midden van de plek aan (fig.1). Niet teveel verf aan het kwastje, haal het langs de rand van de stift tot je de haren van het kwastje ziet. Wacht tot de plekjes zijn gedroogd (5 tot 10 min.) en herhaal indien nodig de behandeling. Figuur 2 laat een zijaanzicht zien hoe het goed is, als in figuur 3 moet het niet. Ben je niet tevreden? Begin dan met zo'n plekje helemaal opnieuw, dus verf verwijderen en weer aangaan. 6. Grote plekken (5 mm en groter) moet je gaan afplakken. Scheur eerst 4 royale stukken plakband af en ook 4 stukken krant. (fig. 4). Plak nu eerst de stukken plakband half op de kranten. Nu het geheel ca. 2 cm buiten de plek aanbrengen op de brommer (fig. 5). 7. Schud nu de spuitbus goed tot je het kogeltje erin vrij hoort rollen. Vergeet niet om tussen het spuiten door de bus af en toe even te schudden. Pak nu een krant en spuit op ca. 20 cm even een strookje. Zo kun je zien hoe je de spuitbus moet houden en zit de verf meteen in de spuitkop. Houd de bus een beetje naar beneden gericht als je spuit (fig. 6). Nu gaan we spuiten: hoeken spuit je op de hoek zelf en van boven naar beneden. Houd de bus nooit stil op een plek als je spuit, maar blijf bewegen. Laat ook de spuitkop los als je een nieuwe laag aanbrengt, anders loopt de verf uit. Spuit ook altijd van voor naar achter, zo werd de brommer ook in de fabriek gespoten. 8. Herhaal dit nog 2 of 3 keer. Spuit elke keer een lichte laag, dus niet dik ineens. 9. Laat nu alles rustig een uurtje of twee drogen en haal vervolgens de kranten met plakband eraf. 10. Plak pas na een dag de transfers erop als je deze hebt verwijderd. Dit is om de nieuwe verf uit te laten harden. Veel succes!!
|
|
P.U.C.H. cilindertm. year 1, issue #1, aug. 1988. Published by the Puch User Club Holland. (c).1988-2001 P.U.C.H. All rights reserved. |
||
 CILINDERtm